HELP
Using Threebrook CraftEye
From first launch and building an inspection to publishing, running the line, tuning, reports, the AI assistant and licensing.
Installing and first launch
The app’s interface is in Chinese for now. This page gives the English meaning with the Chinese label in brackets where it helps you find it.
- Run the installer. You can choose three parts: the main program (required), the deep learning components, and the manual with sample projects.
- There are no preset accounts. On first launch the app asks you to set up an administrator (设置管理员): enter a name and a password of at least 6 characters, twice, and you are signed in as administrator. Keep the password safe; only another administrator can reset it.
- The administrator creates accounts for operators, technicians and developers under Tools › User management (工具 › 用户管理). They can sign in with a password, a PIN or a card.
The app normally opens as an operator. Click Switch user (切换用户) at the top right to sign in as someone else; after 5 minutes without input it goes back to operator.
The four roles
| Role | Can do | Default workspace |
|---|---|---|
| Operator | Start and stop production, see results and NG details, flag suspected misjudgements | Run |
| Technician | Plus: change the parameters developers open up, re-teach, calibrate, review flagged parts, read the audit log (cannot change flows) | Tune |
| Developer | Plus: create and edit projects and flows, publish versions | Develop |
| Administrator | Plus: user management, AI service settings, external AI connections, licensing, exporting the audit log | Develop |
The Runtime edition has no developer workspace: it runs and tunes projects built elsewhere. The Developer edition has all three workspaces.
Start with the samples
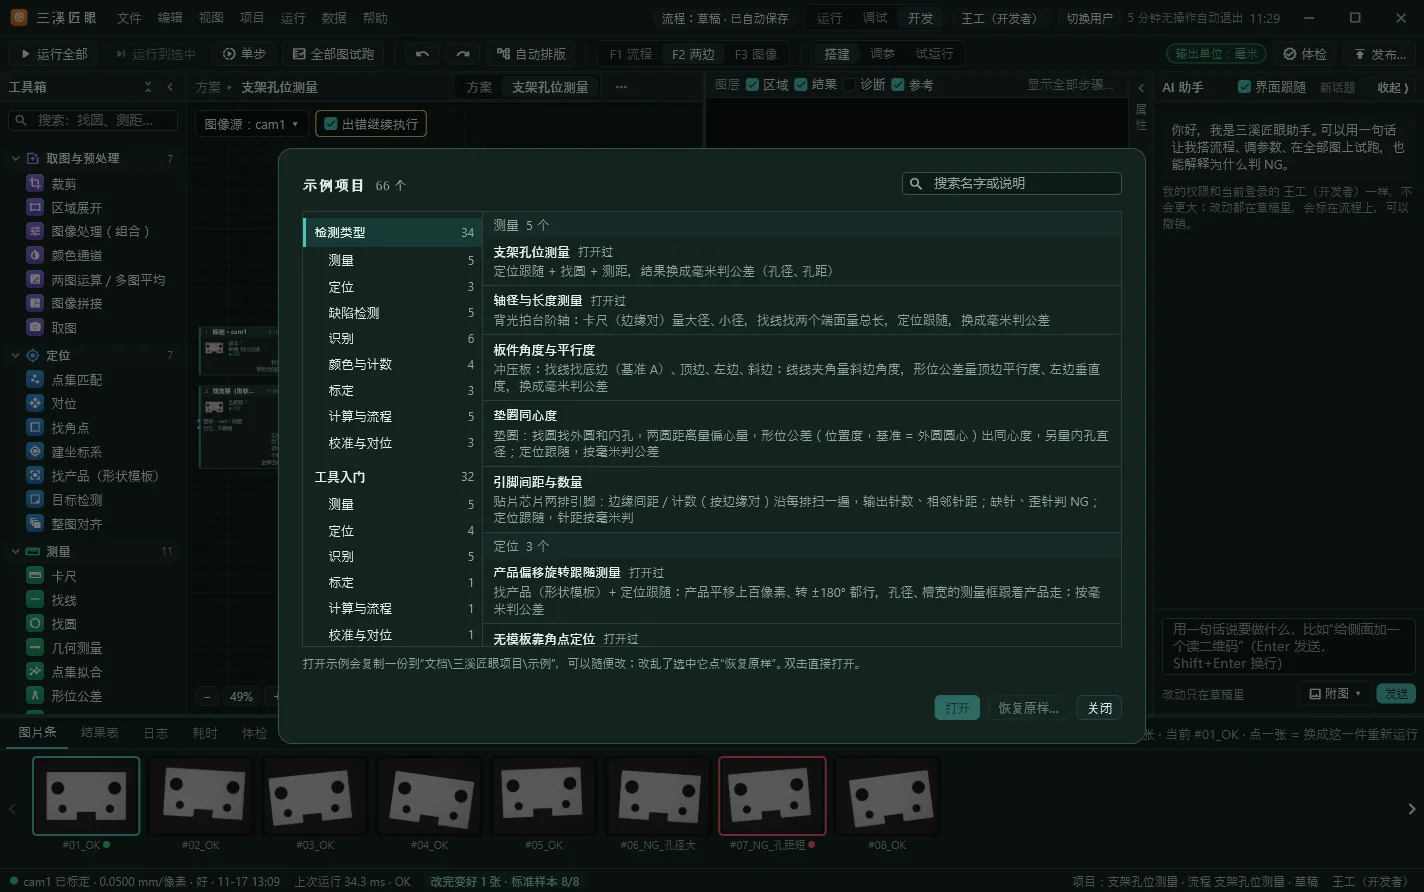
If you installed the manual and sample projects, the samples are copied to Documents\三溪匠眼项目\示例 on first launch. Open them from File › Sample projects (文件 › 示例项目). There are 66 of them, covering locating and measuring, defect inspection, code and text reading, colour and counting, and every sample image has been checked. Change them as much as you like; Restore this sample (当前示例恢复原样) puts one back.
Building an inspection
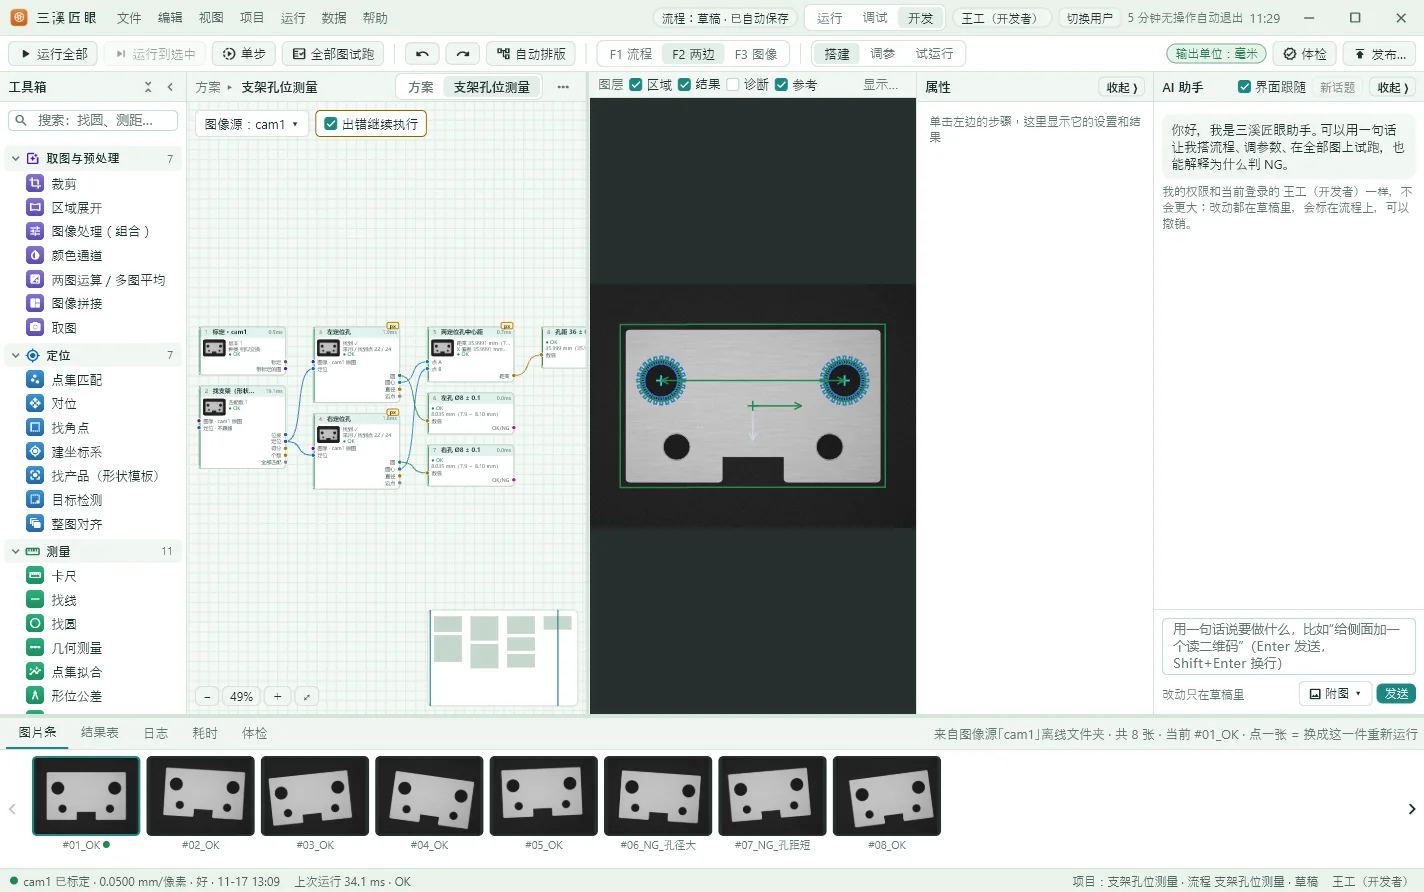
For example, measuring a hole (developer):
- New project: File › New project (文件 › 新建项目), then enter a name and location. A project is one folder holding the image source, flows, parameters, judgements and communication.
- Image source: use a folder or a single image while you develop, and switch to a camera on the line without changing the flow.
- Locate: drag Find part (找产品, shape template) from the Locate group onto the flow canvas, double-click it and follow the teaching wizard: pick a clear, square-on image, draw a box around the part, then test it on every image and click Apply (生效) once it finds them all.
- Measure: drag in Find circle (找圆) from the Measure group. It follows Find part automatically, so its region moves and turns with the part.
- Judge: drag in Judge (tolerance) (判定(公差)), drag the circle output of Find circle to its value input, pick Diameter (直径) from the menu, and enter the nominal value and tolerance in the properties panel.
- Run: click Run all (运行全部) to run the whole flow on the current image, and click other images in the strip below to try them. Each node shows OK or NG at its top right.
Parameter changes apply at once. Ctrl+Z undoes and Ctrl+Y redoes.
Enhancement strategies
When images are hard to read or match, add a few sample images on the node’s Enhancement strategy (增强策略) tab and click Teach (示教). The software tries the candidate preprocessing and parameters on them and stores the combination that works best in the node, which the line then uses as is. Code reading, text reading, measuring, locating, defects and colour all support it. Nodes you haven’t taught give exactly the same results as before.
Publishing and versions
- While you develop you edit a draft, which never affects the line; the line runs only published versions.
- Reference samples are images labelled OK or NG. Before publishing, the software checks every reference sample and publishes only if they all match. Any that don’t are listed; if you really need to publish anyway, Publish anyway (仍然发布) leaves a record.
- Write down what changed when you publish. To go back to an older version, click Restore (恢复) on its row in the version list.
Running production
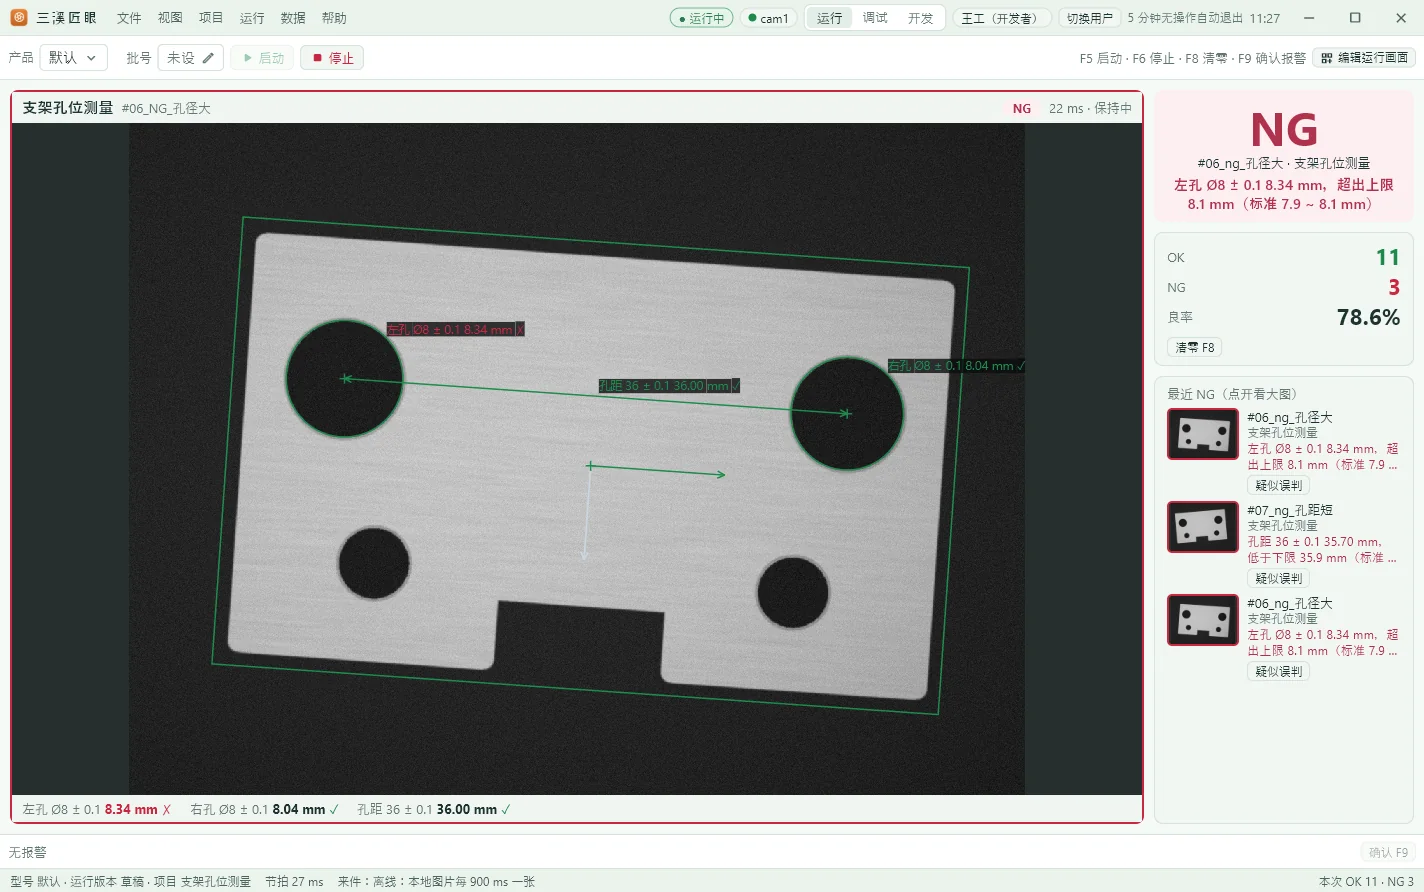
- Operators work in the Run workspace: F5 starts or resumes, F6 stops, F8 resets the counters and F9 acknowledges alarms.
- Each flow has a tile with the latest part’s image, judgement and measurements; on the right are the counts, yield and recent NGs. Click an NG thumbnail for the details: which check failed, what was measured and what the limit is. If it looks wrong, flag it as a suspected misjudgement for a technician to review.
- Switch product with the Product (产品) drop-down and enter a lot number under Lot (批号); a host or PLC can also switch them by message. A product change takes effect between two parts.
- Stations without a PLC can drive OK/NG lamps, stack lights and lighting straight from a camera’s output lines or a remote I/O module, and trigger inspections from a button or photo sensor. Add them under Project › Communication › Add I/O device (项目 › 通讯 › 添加 IO 设备); every output can be tested with On / Off / Pulse first.
Tuning on site (technicians)
Technicians can change only the parameters a developer has opened up, not the flow:
- Switch to the Tune (调试) workspace, pick an item on the left and drag its value on the right.
- Click Trial run (试跑) to run the reference samples and recent images and see how many parts would go from OK to NG or NG to OK.
- If you’re happy, click Apply (生效). The software checks the reference samples first, then creates a minor version that the line uses from the next part.
- If something goes wrong, roll it back from the change history (修改记录) at the bottom.
Data and reports
Every part gets a production record: time, flow, judgement, reason, measurements, image, operator and version. Under Data › Data and reports (数据 › 数据与报表) you can filter by time, shift, product, lot and flow, see production statistics, NG reasons and SPC / CPK for measurements, and export to Excel. Results can also be reported to MES as set up in the project.
Who did what and when is kept in the audit log, which can only be appended to and can be checked for tampering. Technicians and above can read it, and administrators can export it as CSV. It is kept for 3 years by default.
The AI assistant
Needs the AI assistant module. An administrator first chooses a model service in AI service settings and enters its address and key.
- In the AI assistant on the right of the developer workspace, say what you need in one sentence, with an image if you like, for example “make the hole 128±3”, “add a QR code read on the side” or “why is this one NG?”. Ctrl+K asks directly.
- It changes the flow through the software’s own operations, and the software then re-checks every image. Deleting flows, publishing and similar actions wait for you to confirm; every change can be undone, and Stop halts it at any time.
- It can do no more than the person signed in. It won’t label reference samples, start or stop the line, send messages to equipment, import or export, or import licenses; OK and NG are always decided by the inspection program.
When you use the AI assistant, what you type, any images you attach and the necessary project content are sent to the model service you set up. Don’t use it for material that must not leave your organization, or have an administrator turn it off; see the privacy policy.
Using your own AI software
Besides the built-in assistant, AI desktop apps and coding tools on the same computer that support MCP tools can operate CraftEye:
- An administrator ticks Allow external AI to connect under Tools › External AI connection (工具 › 外部 AI 连接), clicks Copy configuration, pastes it into that AI software’s tool settings and restarts it.
- The first time it connects, CraftEye asks whether to allow it once, always allow that program, or refuse. Refuse anything you don’t recognize.
- It acts with the permissions of the person signed in and is logged as “external AI (on behalf of someone)”; deleting and publishing still need your confirmation in CraftEye. The title bar shows when an external AI is connected, and you can disconnect it there.
Trial and licensing
- Trial: everything (the Developer edition and all optional modules) for 30 days from first launch, with the days left shown at the top.
- After the trial: it still runs, but only for 60 minutes each time it is opened, and the developer workspace is locked.
- Getting a license: an administrator copies this computer’s request code from Protection and licensing (保护与授权) and sends it to support@threebrook.com with the company name, the edition wanted (Runtime or Developer) and any modules (deep learning, SDK, AI assistant). Import the license file you receive on the same page.
- Expiry: licenses with an end date start reminding you 30 days before; after expiry there are 7 days of grace in which everything runs, then view only. Stop and Acknowledge alarm always work.
- New computer or reinstalled Windows: a license is bound to one computer. After changing computers or reinstalling Windows, send us the new request code and we’ll reissue it.
Backing up, upgrading and uninstalling
- A project is one folder, and its production records live inside it. Back up the whole project folder regularly, and always before upgrading.
- Upgrading: run the new installer over the old one.
- Uninstalling: remove 三溪匠眼 (Threebrook CraftEye) in Windows Settings › Apps.
Still stuck?
Write to support@threebrook.com with your Windows version, CraftEye version and what happened. If you attach images, please don’t send any that are confidential to your customers.